Fill in a Valid Roof Inspection Form
Common PDF Forms
Netspend Dispute Documents - Take note of the submission deadline to avoid complications with your claim.
When engaging in the sale of a motor vehicle, it's important to utilize the Texas Motor Vehicle Bill of Sale form for a clear and secure transaction. This document serves as a vital record that not only confirms the details of the sale, such as vehicle information, sale price, and date, but also helps to protect both parties involved. For those seeking convenient access to this form and additional resources, visit OnlineLawDocs.com.
Da - Each item listed must clearly correspond to established military inventory standards.
Misconceptions
Misconceptions about the Roof Inspection form can lead to misunderstandings about its purpose and use. Here are nine common misconceptions:
- The Roof Inspection form is only for new roofs. Many believe this form is only necessary for newly installed roofs. In reality, it is essential for all roofs, regardless of age, to ensure ongoing maintenance and safety.
- The form is only needed when there is visible damage. Some people think the form is only relevant when damage is apparent. However, regular inspections help identify potential issues before they escalate, making the form a proactive tool.
- Only professionals can fill out the Roof Inspection form. While trained inspectors provide valuable insights, homeowners can also complete the form. They can document their observations and concerns, which can then be reviewed by a professional.
- The form is too complicated to understand. Many feel overwhelmed by the form's details. In truth, it is designed to be straightforward, allowing anyone to record relevant information about the roof's condition.
- The Roof Inspection form is only for residential properties. Some assume it applies only to homes. However, the form can also be used for multi-family and commercial properties, making it versatile.
- Inspection frequency is not important. A common belief is that inspections can occur at any time. In reality, regular inspections are crucial for maintaining the roof’s integrity and prolonging its lifespan.
- Once the inspection is done, no further action is needed. Some think that completing the form ends the process. However, it is essential to follow up on any recommended actions or repairs noted in the inspection.
- All roof issues are covered in one inspection. Many believe a single inspection can address all potential problems. In fact, some issues may require further investigation or additional inspections to fully assess.
- The Roof Inspection form is just a formality. Some view the form as a mere requirement. In reality, it serves as a vital record that can help in future repairs, insurance claims, and maintaining the roof’s value.
Understanding these misconceptions can help homeowners and property managers utilize the Roof Inspection form effectively, ensuring the longevity and safety of their roofs.
Documents used along the form
When conducting a roof inspection, several other forms and documents can be beneficial for thoroughness and clarity. These documents provide essential information and support the inspection process, ensuring that all aspects of the roofing system are adequately addressed.
- Roof Maintenance Log: This document tracks all maintenance activities performed on the roof, including dates, types of work done, and contractors involved. It helps maintain a history of the roof's care and can inform future inspections.
- Roof Warranty Document: This form outlines the terms and conditions of any warranties associated with the roofing materials or installation. It is crucial for understanding coverage and obligations in case of future issues.
- Building Permit: A record of any permits obtained for roofing work. This document ensures that all modifications comply with local regulations and standards.
- Roof Plan or Blueprint: A detailed drawing of the roof layout, showing dimensions, slopes, and features. This helps inspectors identify areas that may require special attention during the inspection.
- S Corporation Election Form: Essential for small businesses considering S corporation status, this form allows for potential tax savings and must be filed correctly; for more information, visit smarttemplates.net/fillable-irs-2553/.
- Inspection Checklist: A list of specific items to check during the roof inspection. This ensures that no important aspects are overlooked and provides a systematic approach to the inspection process.
- Condition Report: A summary of the roof's current state, including any damage or areas of concern. This report can be used to communicate findings to property owners or management.
- Repair Estimate: A document detailing the costs associated with any recommended repairs or maintenance. This helps owners budget for necessary work and understand potential financial implications.
- Photographic Documentation: A collection of images taken during the inspection. Photos can provide visual evidence of conditions and support findings in reports.
- Client Communication Record: A log of communications with the property owner or manager regarding the inspection findings and recommendations. This ensures transparency and keeps all parties informed.
These forms and documents play a vital role in the roof inspection process. They help maintain accurate records, ensure compliance with regulations, and facilitate communication between all parties involved.
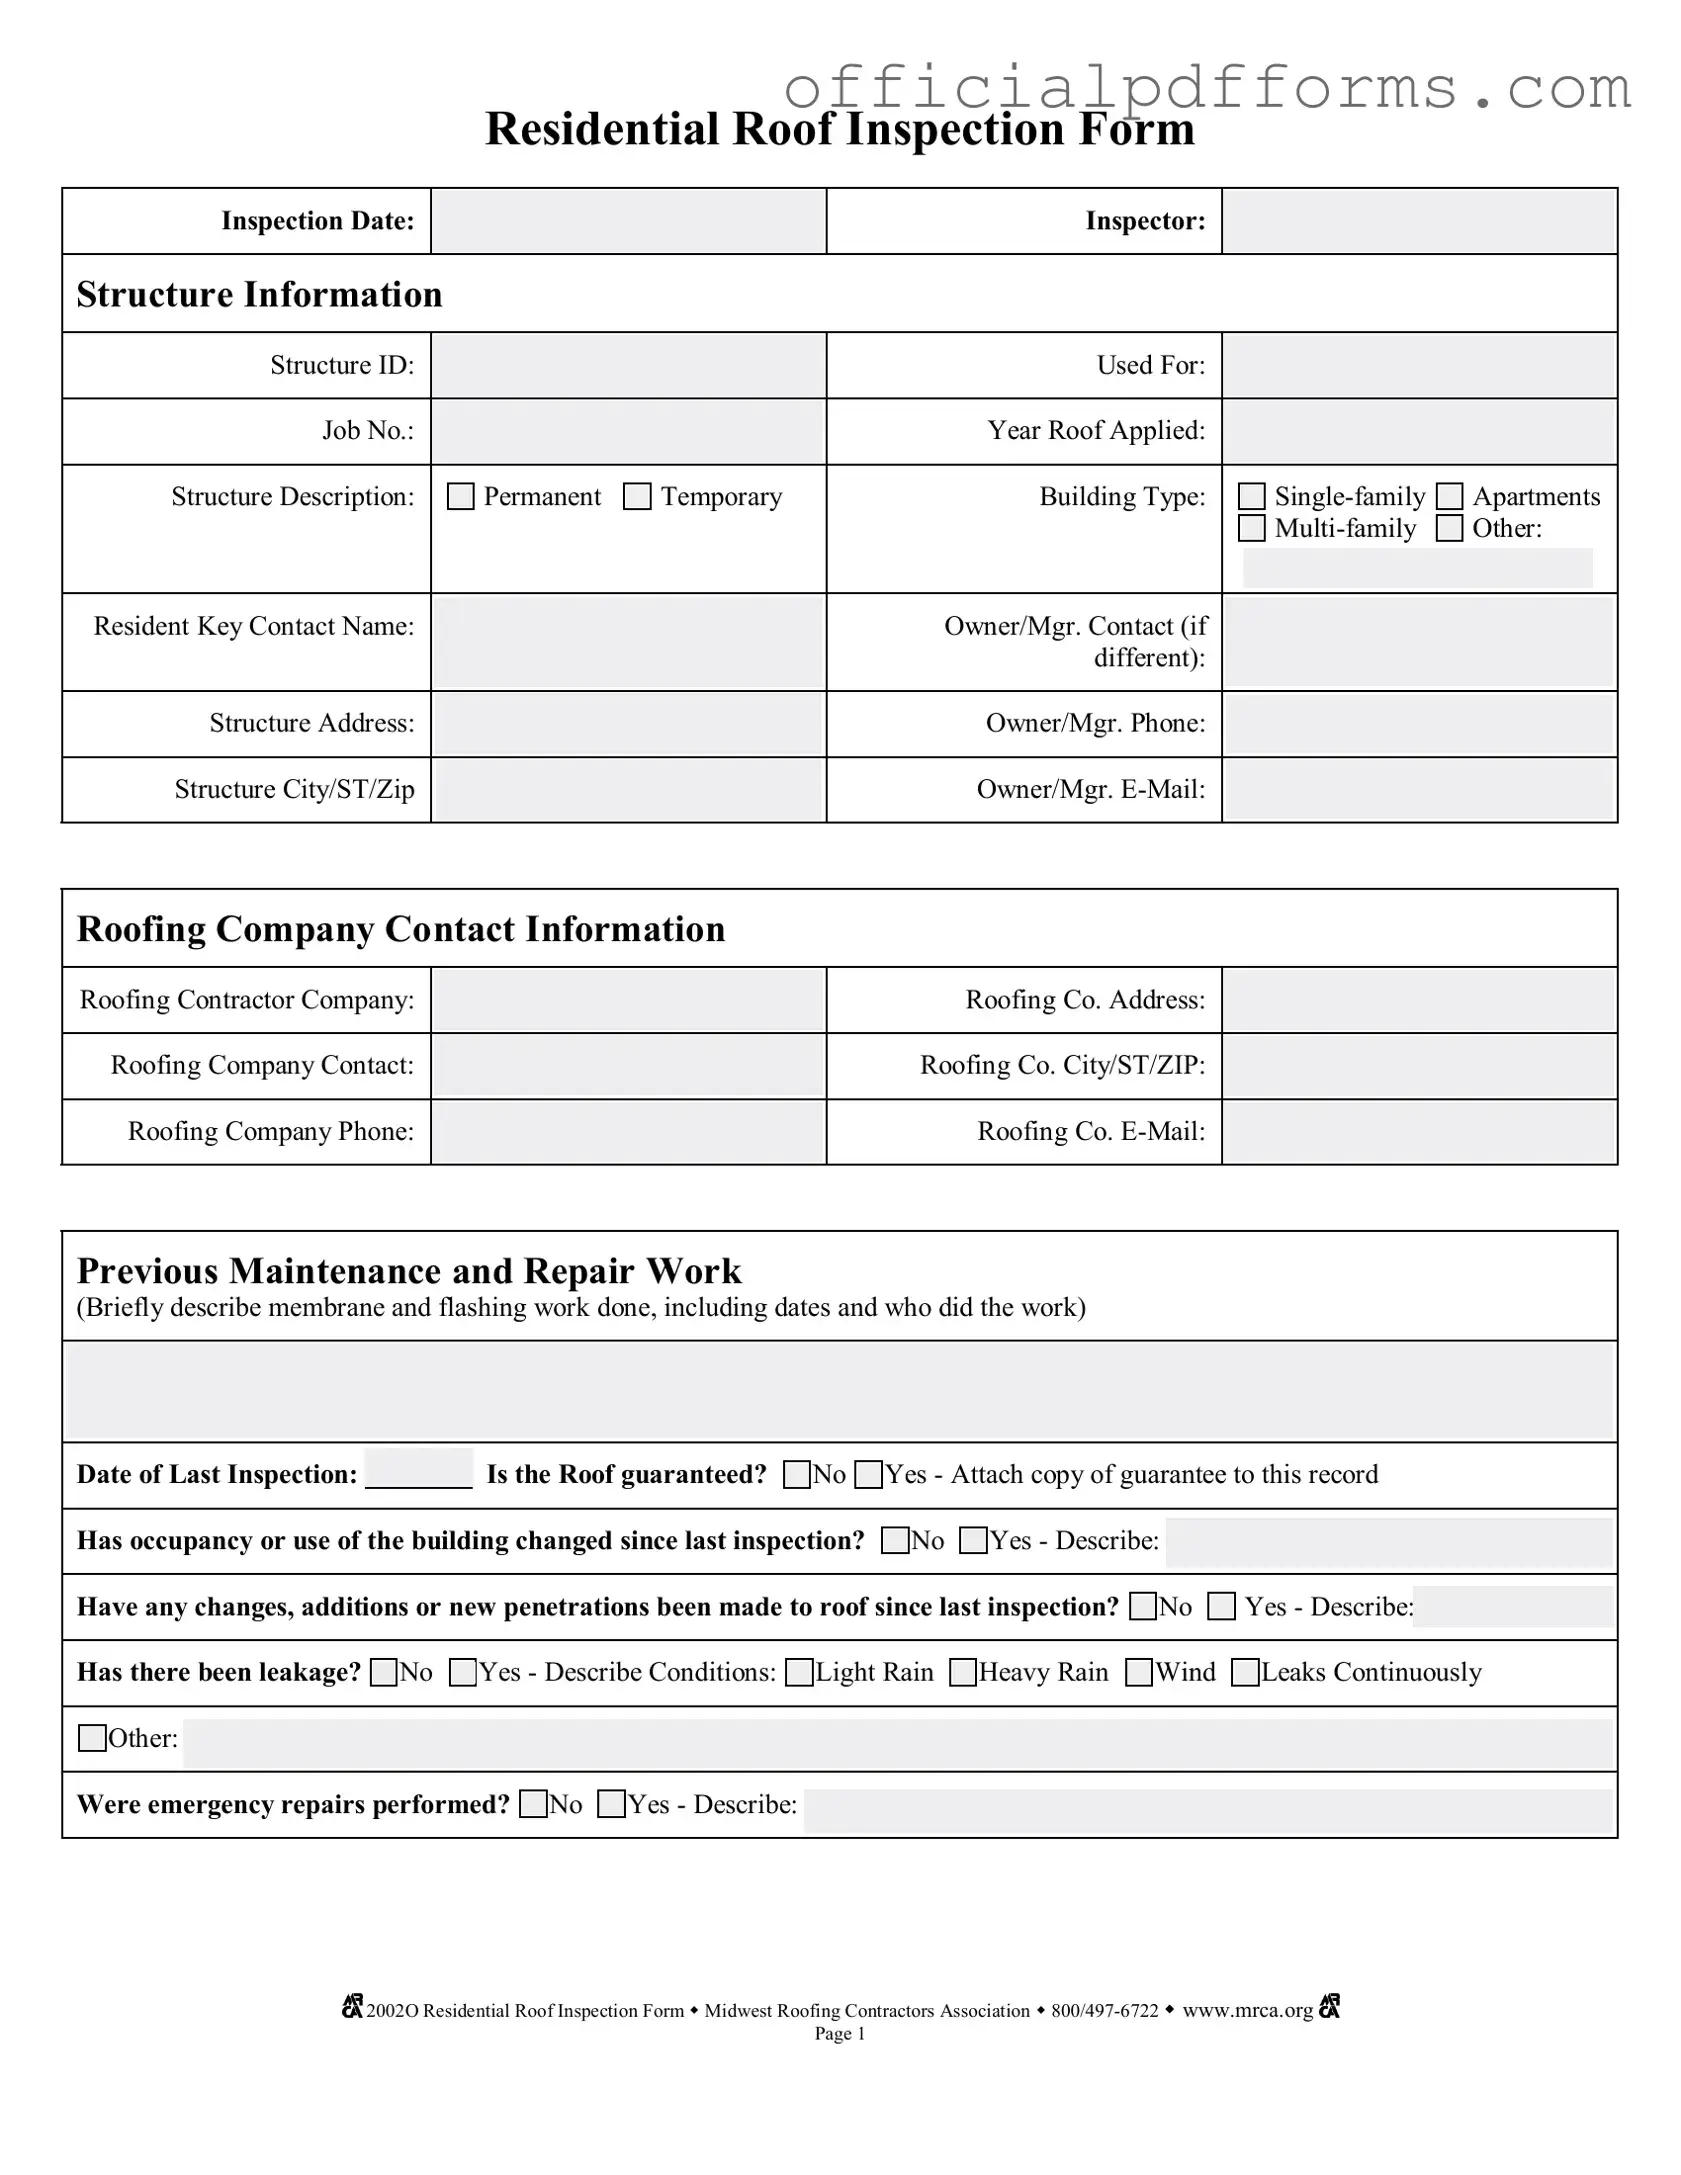
Steps to Filling Out Roof Inspection
Completing the Roof Inspection form requires careful attention to detail. This process ensures that all necessary information is accurately recorded, which is vital for maintaining the integrity of the roof and the structure it protects. Follow these steps to fill out the form correctly.
- Enter the Inspection Date at the top of the form.
- Fill in the Inspector name.
- Provide Structure Information including the Structure ID, Used For (e.g., residential, commercial), and Job No..
- Indicate the Year Roof Applied.
- Describe the Structure by selecting either Permanent or Temporary.
- Select the Building Type from the options given (e.g., Single-family, Apartments, Multi-family, Other).
- Fill out the Resident Key Contact Name and the Owner/Mgr. Contact (if different).
- Provide the Structure Address, including City/ST/Zip.
- Enter the Owner/Mgr. Phone number and Owner/Mgr. E-Mail.
- Complete the Roofing Company Contact Information section with the Roofing Contractor Company name, address, contact person, city/state/ZIP, phone number, and email.
- In the Previous Maintenance and Repair Work section, briefly describe any membrane and flashing work done, including dates and who performed the work.
- Record the Date of Last Inspection.
- Indicate whether the roof is guaranteed by selecting No or Yes and attaching a copy of the guarantee if applicable.
- Answer whether the occupancy or use of the building has changed since the last inspection by selecting No or Yes and providing a description if applicable.
- State whether any changes, additions, or new penetrations have been made to the roof since the last inspection by selecting No or Yes and providing a description if applicable.
- Indicate if there has been leakage by selecting No or Yes and describing the conditions.
- State whether emergency repairs were performed by selecting No or Yes and providing a description if applicable.
- For the Code Condition section, mark the appropriate code (G, F, P) for each location and action taken as you assess the roof.
- Complete the Photographic Record section by indicating if you have film or digital photography or video evidence.
- Ensure all items are marked with the appropriate code on the roof plan grid.
- Keep copies of the inspection forms and any photographic or other evidence with the Roof Historical Record.
Common mistakes
-
Incomplete Structure Information: Failing to provide all necessary details such as Structure ID, Job No., and Year Roof Applied can lead to confusion. Each field must be filled out accurately to ensure proper tracking and identification of the roof inspection.
-
Neglecting Previous Maintenance Records: Omitting details about past maintenance and repair work can hinder the inspector's ability to assess the roof's current condition. It's crucial to describe all previous work, including dates and contractors involved.
-
Not Specifying Changes Since Last Inspection: Failing to indicate any changes, additions, or new penetrations made to the roof since the last inspection can result in overlooking potential issues. Always describe any modifications clearly.
-
Ignoring Condition Codes: Misclassifying the condition of various roof components by not using the provided codes (G, F, P) leads to inaccurate assessments. Each area must be evaluated and marked appropriately to reflect its status.
Get Clarifications on Roof Inspection
What information is required on the Roof Inspection form?
The Roof Inspection form collects essential details about the property and the roof being inspected. Key information includes:
- Inspection Date
- Inspector's Name
- Structure Information such as ID, type (single-family, multi-family, etc.), and address
- Contact information for the owner or manager
- Roofing Company details including name, address, and contact information
- Previous maintenance and repair work history
Completing these fields accurately helps ensure a thorough inspection and record-keeping.
How do I know if my roof needs immediate action?
The Roof Inspection form includes a section for assessing the condition of various components of the roof. Inspectors will use a coding system: G for Good, F for Fair, and P for Poor. If any areas are marked as 'P', immediate action is recommended. Common issues that may require urgent attention include:
- Severe leaks or water damage
- Significant structural issues like sagging or cracking
- Missing or damaged roofing materials
If you receive a report indicating poor conditions, it’s important to address these issues promptly to prevent further damage.
What should I do if there has been a change in the building's occupancy or use?
Any changes in occupancy or use of the building can affect the roof's condition and maintenance needs. If there has been a change since the last inspection, it is crucial to note this on the form. Describe the change clearly. For example, if a residential building is now being used for commercial purposes, this may increase foot traffic on the roof or change the load requirements. Such factors could necessitate a more thorough inspection or different maintenance practices.
Is there a guarantee on the roof? How does that affect the inspection?
If the roof is guaranteed, it’s important to attach a copy of the guarantee to the inspection record. This document may outline the coverage and conditions of the warranty. Knowing whether your roof is under warranty can influence decisions regarding repairs and maintenance. If issues are found during the inspection, the warranty may cover some or all of the repair costs, depending on the terms.
What if emergency repairs were performed before the inspection?
In the event that emergency repairs were made, it’s essential to document these on the Roof Inspection form. Describe the nature of the repairs and the conditions that led to them. This information provides context for the inspector and helps in assessing the overall condition of the roof. Emergency repairs might indicate underlying issues that need further investigation, so thorough documentation is key.